|
Fuel Tank Design & Installation Replacing an
Old Fuel Tank? Here's a few tips to get the most out of your
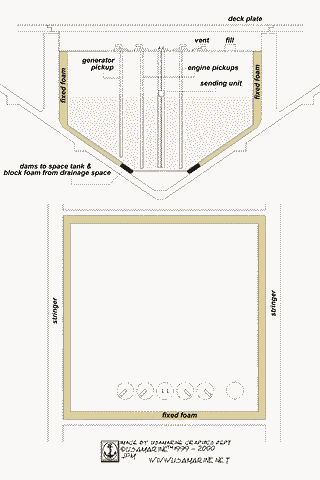
investment... Using 2 Part Polyurethane Foam One of the most commonly used materials is aluminum. You'll have little problem finding either a prefabricated tank or having one custom fabricated locally. The main concern with aluminum is oxidation pitting which will lead eventually to leaking. This can be averted by applying a 16 - 18 mil exterior coating of coal tar epoxy, (about $50 per gallon), prior to installation. Don't consider coal tar epoxy as optional... It should be a "MUST DO STEP". ( Also recommended: DEVTAR� 5A Contains No Coal Tar. A high performance, two-component, chemically-cured high-build epoxy coating for use in areas where coal tar epoxy is normally used. Uniquely formulated to provide corrosion protection for steel and masonry surfaces exposed to water immersion or chemical splash, spillage and fumes. Self-priming on most surfaces. Outperforms Coal Tar Epoxies in all respects, including improved recoatability, toxicity, film embrittlement and application properties. http://devoecoatings.com/msds.html For aluminum, you'll want to prep first with ALUMIPREP� 33 CLEANER & CONDITIONER ) Other materials include, (in order of desirability): Monel (no coating required, but still a good idea.)Do not bond your new tank into the boat. To achieve a form fit, first wrap the tank tightly with polyethylene sheeting, (Visquene), center the tank where you want it, and cast in the voids with a 2 part, 4 lb density polyurethane foam. You'll want to support the tank above the hull surface with either strips of PVC foam, (Divinycell for example), or thick rubber. Allow enough space for the foam mix to easily fill in under the tank. An inch of thickness is fine. You'll also need to temporarily lock the tank down so that the foam wont float it up during the expansion phase. After the foam cures trim it back flush with the top of the tank. Next, cover this level with the poly sheeting, including the exposed sides and cast in a solid block of foam that can then be lifted out. Trim away the excess to allow the deck plate to be reinstalled and cut in, as necessary, access holes for your fill tube, pickup fitting, and sending unit fitting. This plug can be lightly glassed for longevity if desired. After all of your foam work is done, remove the tank and discard all of the poly sheeting. You now have a form fitted cavity and will have no problem with removing the tank at some future date if need be, and your tank should meet or exceed the life expectancy of the boat.
Link to Original Article from Bertram31.com on Fuel Tank Design |
